

How to Spot Counterfeit Physical Media: A Buyer's Guide
Last Updated: October 23, 2026
Quick Summary
To spot counterfeit physical media, examine the disc underside for a smooth, reflective silver or gold surface instead of a purple or blue tint, check for molded matrix codes and hub identifiers in the inner ring, and verify the packaging matches the disc with sharp printing and sturdy materials. A pattern of red flags, mismatched catalog numbers, missing inner-ring markings, and playback failures, signals a counterfeit.
- Pressed discs have smooth, mirror-like silver or gold undersides; burned counterfeits show purple, blue, or green tints and feel waxy or uneven.
- Legitimate discs have matrix codes and hub identifiers molded into the polycarbonate during manufacturing, not printed on top.
- Counterfeit packaging often uses thin, brittle plastic with fuzzy cover art, misaligned text, and loose or crooked booklets.
- Verify the catalog number and barcode against a release database before inspecting the physical disc.
- No single check proves counterfeiting; two or more red flags together warrant walking away from the purchase.
Table of Contents
- Why Spotting Counterfeit Physical Media Matters
- How to Tell If a DVD Is a Bootleg
- How to Spot a Counterfeit CD
- CD Matrix Code Verification
- Inspect Packaging and Cover Art
- Physical Media Authenticity Checklist
- What to Do If You Suspect a Counterfeit
- Frequently Asked Questions
Why Spotting Counterfeit Physical Media Matters
Buying physical media from independent artists supports real creators, but counterfeits are everywhere online, and knowing how to spot counterfeit physical media protects both your wallet and the artist. Learn more about the benefits of owning authentic physical music media before diving into authentication techniques.
Counterfeit physical media costs you money and time, and the profits go to counterfeiters instead of the creator. At TXMRB, we believe in authentic, handcrafted products, so we're sharing how to spot counterfeit physical media before you buy.
Learning to identify bootleg discs protects your collection, ensures your money reaches the right people, and spares you a product that doesn't work. The same core methods apply to CDs, DVDs, Blu-rays, and other formats.
How to Tell If a DVD Is a Bootleg
A bootleg DVD is an unauthorized copy, a home-burned disc, a cheap overseas reproduction, or a disc pressed to look like a retail release. Appearance alone won't settle it; the strongest evidence combines the disc's look, what is stamped into it, and what the packaging claims.
Start with the disc underside and surface
Turn the DVD over in good light.
Run a finger gently across the underside: a pressed disc feels uniform, while a burned disc may feel waxy or uneven. Scratches or residue suggest poor handling during production or repackaging.
Examine the center hub where the disc seats in the player. On legitimate discs the hub is precise and uniform. On burned discs it can look rough or uneven.
Compare pressed discs versus DVD-R recordable media
Pressed DVDs are stamped from a master in industrial facilities, so every copy is essentially identical and the playback layer is molded into the plastic.
The underside color is the fastest giveaway: pressed discs read silver or gold, DVD-R media reads purple, blue, or green. The label side matters too, pressed discs have labels bonded during manufacturing, while bootlegs often have labels printed directly onto the surface or applied poorly, peeling at the edges.
Look for matrix and hub identifiers, not just color
Color is a starting point, not proof. The stronger evidence is the tiny text stamped into the inner ring, the matrix code and hub markings around the center hole.
A practical check: tilt the disc under a lamp and look at the inner ring. Genuine pressed discs typically carry a matrix string plus a small IFPI-style source code near the hub identifying the pressing plant. A disc claiming to be a factory release but showing no molded inner-ring markings, or markings that look printed, is a red flag.
Check the packaging against the disc
Legitimate releases use quality materials and professional printing: sharp cover art, consistent colors, legible text. Counterfeit covers often look fuzzy or pixelated, with dull colors or misaligned text.
Look inside: legitimate releases have properly aligned inserts and neatly bound booklets, while counterfeits often have misaligned inserts, loose or crooked booklets, or missing pages skipped to save money. Compare the back cover's list of included materials against what is actually in the case.
Separate a counterfeit from a legitimate reissue or import
Not every difference means fake. Studios reissue catalog titles with new artwork, labels, and matrix codes, and legitimate imports often carry region markings, foreign-language packaging, or distributor stickers that look unusual next to a domestic copy. A used disc with light scratches and a worn case isn't automatically counterfeit, wear is normal.
The distinguishing question is consistency: do the disc, case, insert, and printed details all describe the same edition? A legitimate reissue has matching copyright lines, catalog numbers, and distributor information across all of them.
How to Spot a Counterfeit CD
CDs are easier to counterfeit than DVDs because the technology is older. Many counterfeit CDs are burned copies; others are poorly reproduced overseas.
A legitimate CD is pressed from a master in a factory, with a smooth, uniform, reflective silver underside. Counterfeit CDs often have a purple or blue tint and visible defects.
Check the center hole: on real CDs it is perfectly round and precise, while on burned CDs it may be slightly off-center or rough-edged because home burners are less precise than factory equipment.
Examine label quality and printing method
The label is often where counterfeits fail. Real CDs have labels printed professionally, sharp text, vibrant, consistent colors, and firmly bonded to the disc.
Counterfeit CDs often use cheap inkjet labels: fuzzy text, bleeding or washed-out colors, and labels that peel easily or feel loose. Run your finger over the label, a real one feels smooth and permanent, a fake one slightly raised or waxy.
Look for printing errors: spelling mistakes, misaligned text, a barcode printed incorrectly or at an odd angle, or inconsistent fonts and sizes.
CD Matrix Code Verification
Every legitimate CD has a matrix code stamped into the underside during manufacturing. Unique to each pressing, it includes the manufacturer, pressing plant, and production date.
The matrix code appears as tiny text or numbers around the center hub on the underside.
Look closely near the center of any CD you're considering.
Legitimate independent artists often work with small pressing plants. The matrix code identifies that plant. Research the plant name if you want to verify authenticity further.
Inspect Packaging and Cover Art
The packaging tells you a lot about whether a physical media release is authentic.
Check the cover art first.
Feel the packaging material. Legitimate CDs and DVDs come in sturdy cases with solid plastic and smooth hinges.
Look inside the case. Legitimate releases have properly aligned inserts, neatly bound booklets, and straight pages.
Check for missing pages or inserts. Legitimate releases include all promised content, while counterfeits sometimes skip pages to save money.
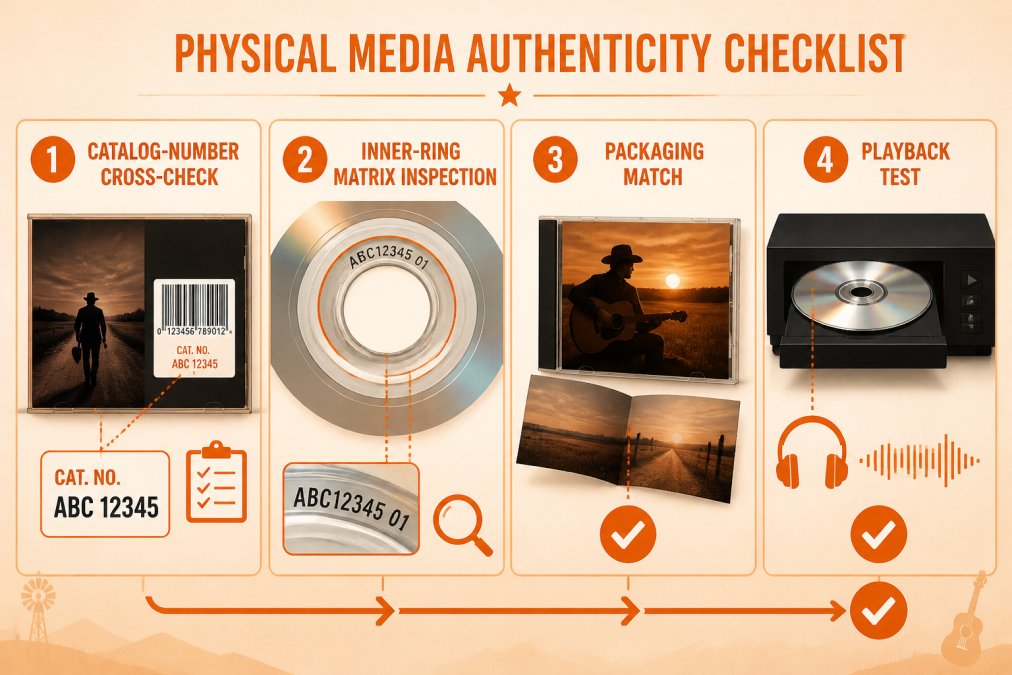
Physical Media Authenticity Checklist
A checklist is only useful if it tells you what to do with each result. Use this as a verification workflow: work from the cheapest, fastest checks to the most conclusive ones, and treat a single red flag as a reason to slow down rather than a final verdict.
Step 1: Verify the edition before you inspect the disc
The fastest way to catch a counterfeit is to confirm the edition actually exists. Find the catalog number, barcode, and release date printed on the case or back cover, then cross-check them against a release database or the label's own catalog.
This step also protects you from false alarms. Legitimate reissues, imports, and manufacturer variations often look different from the copy you remember, but their catalog numbers and barcodes still resolve correctly. If the numbers check out, packaging differences are more likely legitimate variation than counterfeiting.
Step 2: Inspect the disc identifiers
| Check | What to Look For | Red Flag |
|---|---|---|
| Disc underside color | Silver or gold (pressed) | Purple, blue, or green tint (recordable media) |
| Surface texture | Smooth and uniform | Mottled, dull, or waxy |
| Center hub | Precise and uniform | Rough or uneven |
| Inner-ring matrix | Molded into the plastic, catches light | Missing, printed on top, or laser-etched in a different style |
| Hub source code | Small molded code near the center hole | No code, or a code that looks printed |
| Label bonding | Firmly attached | Peeling or loose at edges |
| Label printing | Sharp, clear text | Fuzzy, blurry, or misaligned |
Step 3: Match the packaging to the disc
| Check | What to Look For | Red Flag |
|---|---|---|
| Cover art | Sharp and clear | Pixelated or fuzzy |
| Case plastic | Sturdy and solid | Thin or brittle |
| Hinges | Smooth operation | Loose or broken |
| Booklet binding | Neat and aligned | Loose or crooked |
| Copyright and distributor lines | Consistent across case, insert, and disc | Mismatched or missing |
Step 4: Run a playback and data-integrity check
Visual inspection has limits, so let the disc prove itself. Play it on a standard player and watch for menus that load slowly, chapters that skip, audio that drifts out of sync, or a runtime that does not match the listed length. On a computer, check that the disc's file structure and total data size are plausible for the format, a DVD claiming a full feature film but holding only a fraction of the expected data is a warning sign.
Step 5: Apply format-specific checks
The same workflow adapts to each format:
- CDs: Confirm the matrix code is molded, not printed, and check that the label printing is sharp. Burned CDs show the telltale dye tint on the underside.
- DVDs: Check the inner-ring matrix and hub code, then compare the disc label against the case edition.
- Blu-rays: Look for the hard-coat finish and the molded inner-ring markings; burned Blu-ray media is less common but reprinted labels and mismatched cases are not.
- Game discs: Verify the catalog number and region marking against the case, and check that the disc's inner-ring identifiers match the publisher's known pressing style.
What to Do If You Suspect a Counterfeit
If you've already purchased physical media and suspect it's counterfeit, document what you found.
Contact the seller immediately. Explain what you observed. Include your photos. Request a refund or replacement.
Report the listing to the platform where you bought it. Whether it's an online marketplace, auction site, or independent seller, report counterfeits. Platforms take this seriously.
If you bought from an independent artist directly, contact them.
Never resell counterfeit media. Passing counterfeits along perpetuates the problem. It harms other buyers and the original artist. Dispose of it responsibly instead.
When buying physical media in the future, stick with trusted sources. Discover trusted retailers and direct sources for genuine physical music to avoid counterfeits in the first place.
Supporting independent creators means buying authentic physical media. When you buy from independent artists like Michael, you're investing in real creativity and real stories. Visit TXMRB.com to explore authentic physical media and handcrafted products made with care in Liberty Hill, Texas.
Frequently Asked Questions
What are the most obvious signs of counterfeit physical media?
Common indicators include discolored or uneven disc surfaces, poor label printing with blurry text or misaligned graphics, mismatched or missing release information, cheap or flimsy packaging, and spelling errors on cover art. Authentic releases have consistent, professional printing and packaging. If multiple details seem off, the media is likely counterfeit.
How do I verify a CD using the matrix code?
The matrix code is etched into the disc's inner hub area and contains the manufacturing plant code, replication year, and batch number. Cross-reference this code with the release database or the label's official records. Counterfeit CDs often have missing, illegible, or inconsistent matrix codes.
Can a counterfeit disc still play correctly?
Yes. A counterfeit disc may play without obvious errors, especially on first use. However, bootleg and home-burned media often exhibit skipping, audio dropouts, or degradation over time. Pressed discs (authentic manufactured copies) are more durable. If packaging and labeling look suspicious but the disc plays, verify other details like catalog numbers and release dates before assuming authenticity.
How can I tell the difference between a counterfeit and a legitimate reissue or import?
Legitimate reissues and imports have proper documentation: correct catalog numbers, official label branding, and consistent packaging design. Counterfeits lack this documentation or show inconsistencies. Check the distributor's website or contact the artist or label directly. Independent artists can confirm their own releases and provide authenticity details.
