

How to Spot Quality 3D Prints: A 2026 Inspection Guide
Table of Contents
- The 7-Point Framework for Spotting Quality 3D Prints
- Common 3D Printing Defects and What Each One Signals
- How Bed Leveling and First-Layer Calibration Decide Print Quality
- 3D Print Surface Finish Quality: What Smooth Really Means
- 3D Printing Post-Processing Techniques That Reveal or Hide Flaws
- Material-Specific Quality Indicators Most Buyers Miss
- How to Inspect Quality 3D Prints Before You Buy
- Frequently Asked Questions
Last Updated: September 30, 2026
The 7-Point Framework for Spotting Quality 3D Prints
Spotting quality 3D prints comes down to one skill: reading a finished piece the way a mechanic reads an engine. Every fidget, dog tag, and articulated dragon can be checked against the same seven points.

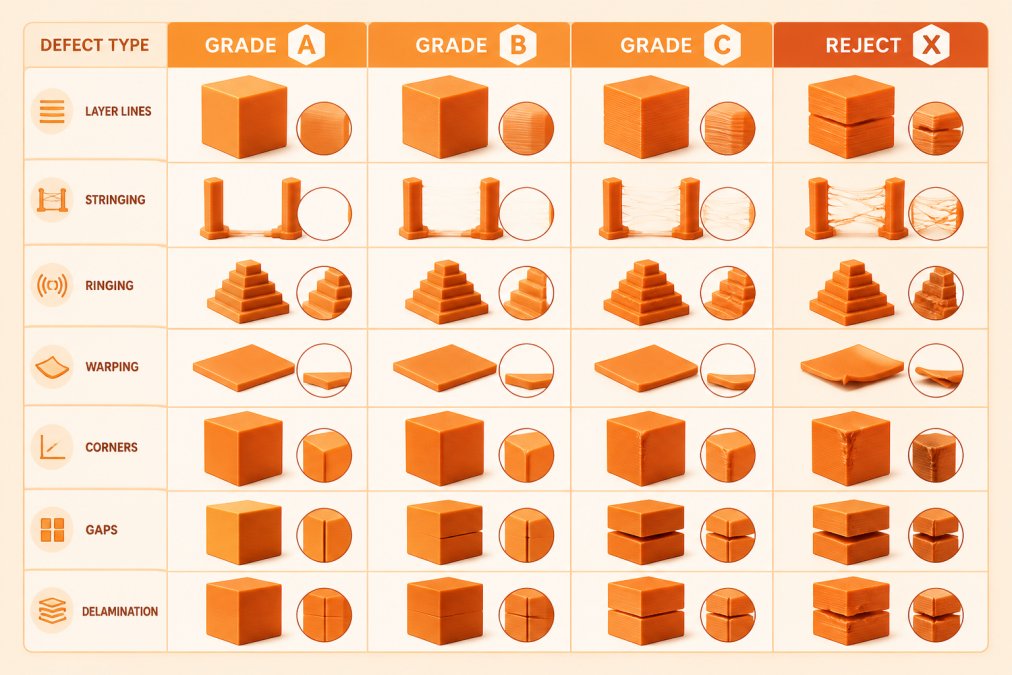
Here is the framework we use:
- First layer and bed adhesion - the foundation everything else sits on
- Layer consistency - uniform lines from bottom to top
- Surface finish - no blobs, zits, or visible stringing
- Dimensional accuracy - parts fit and measure as designed
- Structural integrity - no gaps, delamination, or weak joints
- Detail retention - sharp corners and small features intact
- Material condition - no brittleness, discoloration, or moisture damage
Why a Standard Beats a Gut Feeling
A gut feeling changes with the lighting in the room. A standard does not.
The Visual Grading Scale: A, B, C, and Reject
Grade A means no visible layer lines at arm's length, crisp corners, uniform color, and a first layer with no gaps. Grade B shows faint layer lines and minor stringing you can brush away. Grade C has visible ringing, slight warping, or inconsistent extrusion. Reject means layer shifts, gaps, or delamination.
Common 3D Printing Defects and What Each One Signals
Every common 3D printing defect is a message from the machine, and reading those messages beats memorizing a troubleshooting chart.
Layer Shifts, Stringing, and Ringing
A layer shift is a horizontal offset where the print head skipped position, usually from a loose belt or a nozzle catching a curled edge. It is almost always a reject.
Warping, Under-Extrusion, and Nozzle Clogs
Warping shows as lifted corners or a bowed base from uneven cooling, and on a flat-bottomed item it means the piece will rock on a desk.
How Bed Leveling and First-Layer Calibration Decide Print Quality
The first layer decides whether everything above it has a chance, and bed leveling and z-offset calibration matter most.
3D Print Surface Finish Quality: What Smooth Really Means
3D print surface finish quality describes how the outer skin of a print looks and feels, and it is the most visible quality indicator a buyer can judge without tools. But "smooth" is not one thing, and the number that matters most is layer height.
Here is what to check, in order:
- Run a fingernail lightly across the surface. It should feel like fine corduroy, not sandpaper. Sandpaper texture usually means over-extrusion or a nozzle temperature running hot.
- Tilt the piece under a lamp. Consistent sheen means consistent extrusion; patchy sheen means flow rate drifting across the print.
- Look at overhangs and bridging. Clean undersides mean the cooling fan is dialed in; sagging undersides mean the plastic cooled too slowly to hold its shape.
- Check vertical walls for z-wobble, a repeating wave pattern from a bent lead screw or loose z-axis coupler. Measure the spacing between ripples; that interval points to the mechanical part causing it.
- Check the top surface for pillowing, a bumpy, inflated look from too few top layers or insufficient cooling. A properly finished top is flat and closed, not puffy.
Geometry Changes the Baseline
This is the part most guides skip. Complex overhangs, thin walls, and tall unsupported spans are harder to print cleanly than a flat box, so the same surface quality means different things depending on the model.
3D Printing Post-Processing Techniques That Reveal or Hide Flaws
3D printing post-processing techniques fall into two groups: those that improve a print and those that disguise it. Knowing the difference protects you as a buyer, and knowing how to test the result protects you as a maker.
Non-Destructive Integrity Tests You Can Run by Hand
Most guides stop at visual inspection. These checks test structure without breaking the part:
- The flex test. Gently press the walls of a hollow section. They should resist and spring back. If they flex more than expected for the wall thickness, the interior is likely under-extruded even though the surface looks fine.
- The tap test. Tap the part lightly with a fingernail. A solid, consistent tone suggests good layer bonding; a dull or hollow-sounding area can indicate a gap or missed layer underneath.
- The weight test. A print that feels light for its size is often under-extruded internally. Compare two prints of the same model if you can; a noticeable weight difference points to a flow rate problem on one.
- The corner test. Press a thumb into a sharp internal corner, where layer adhesion fails first. If a corner crumbles or separates under light pressure, the bond is weak.
- The seam check. Find the vertical seam where each layer starts and stops. A clean seam is a thin, straight line; a ragged or bulging seam means retraction or pressure advance is off, and it is often the first place a print cracks under load.
The Grading Rubric, Applied
Put the 7-point framework and these tests together and you get a repeatable grade:
| Grade | Surface | Structure | Fit |
|---|---|---|---|
| A | No visible layer lines at arm's length, crisp corners | Flex and tap tests pass, no seam issues | Measures as designed, joints move freely |
| B | Faint layer lines, minor stringing | Flex test passes, minor seam roughness | Small dimensional variance, joints work |
| C | Visible ringing, slight warping | Walls flex more than expected | Noticeable variance, stiff joints |
| Reject | Layer shifts, gaps, delamination | Corner crumbles, hollow tap tone | Does not fit or measure as designed |
Material-Specific Quality Indicators Most Buyers Miss
Different materials fail in different ways, and most buyers never learn the difference. PLA, the most common filament for handmade goods, is stiff and prints with sharp detail but softens in a hot car. PETG flexes slightly more and handles heat better.
For PLA specifically, watch for:
- Brittleness - a piece that snaps instead of flexing has likely absorbed moisture
- Discoloration - cloudy or uneven color points to inconsistent nozzle temperature
- Layer adhesion - walls should not separate when you press them together
MatWeb materials property database
How to Inspect Quality 3D Prints Before You Buy
When you cannot hold the item first, inspect the photos and listing language instead.
| What to Check | Good Sign | Warning Sign |
|---|---|---|
| Photos | Multiple angles, raking light | One soft-focus front shot |
| Listing text | Names the material and process | Vague "high quality" claims |
| First layer | Visible flat bottom shown | Bottom never photographed |
| Joints (articulated) | Shown mid-pose | Only shown closed |
| Maker details | Names the process and shop | No process information |
UL 746 plastics testing standards
Frequently Asked Questions
What are the most common signs of a low-quality 3D print?
The clearest signs are visible layer shifts, stringing between parts, and warped corners that lift off the base. You may also notice ringing, which looks like ripples near sharp corners, or under-extrusion that leaves gaps in the walls. A low-quality 3D print often feels rough, has uneven color, or shows inconsistent layer height. Inspect the first layer carefully, since it sets the foundation for everything above it.
How do layer height and resolution affect the final look of a 3D print?
Layer height controls how visible the horizontal lines are on a finished print. A 0.1 mm layer height produces finer detail and smoother surfaces, while 0.3 mm layers are faster but show more texture. Resolution also affects how well overhangs and curved shapes render. For decorative pieces, lower layer heights usually look better. For functional parts, a slightly thicker layer can improve structural integrity without hurting performance.
How can you tell if a 3D print has been properly finished?
A properly finished print has consistent color, no loose strings, and smooth transitions between flat surfaces and curves. Check for sanding marks or uneven paint that could hide defects underneath. Look at the edges: sharp, clean corners suggest good calibration. If the print was smoothed with post-processing techniques like sanding or vapor smoothing, the surface should feel uniform. Any tackiness, discoloration, or missed spots suggest rushed finishing.
What is the difference between a functional 3D print and a decorative one?
Functional prints prioritize strength, dimensional accuracy, and layer adhesion over appearance. They may show visible layer lines or minor surface imperfections but hold up under stress. Decorative prints focus on surface finish quality, fine detail, and smooth curves. When judging quality, match your standard to the purpose. A fidget toy needs smooth action and durable joints, while a display piece needs clean lines and even color.
Why do some 3D prints have visible lines while others look smooth?
Visible lines come from layer height, nozzle temperature, and print speed. Thicker layers and faster speeds create more pronounced ridges. Smooth prints usually use thinner layers, slower speeds, and well-tuned slicer settings. Material choice matters too: matte filament hides lines better than glossy filament. Post-processing techniques like sanding or filler primer can also remove visible lines on decorative pieces.
How common are failed 3D prints?
Failed prints are a normal part of 3D printing, especially when dialing in a new material or profile. Common causes include poor bed leveling, moisture in filament, and incorrect nozzle temperature. Most failures show up in the first few layers, which is why inspecting the first layer matters. Regular calibration and storing filament in a dry box reduce failure rates significantly. Even experienced makers expect occasional failures.